Lightroom’s Smart Previews, your new best friend
What are Lightroom’s Smart Reviews
Adobe’s Lightroom is a fantastic piece of software. It may not be the best photo editor (Capture One for example is still the reference IMHO), it may not be the best to organise your photos (Photo Mechanic is pretty awesome too), but it does all of that very well, and furthermore it offers so many features that makes the photographer’s life easier.
The last example I have is Smart Previews. I must say I’ve discarded them as soon as they appeared. Imports are already long enough, between copying the photos to the hard drive, generating the previews… Who cares about another kind of preview? They are actually smaller DNG files created after the original RAW files and that keeps all their flexibility, except with a lower resolution and therefore a lesser MB footprint. Their usage became clearer to me when I started using Lightroom Mobile: it synchronizes Smart Preview over Adobe’s Creative Cloud in order for the Mobile App to work with. It’s become quite useful, but my older and slow iPad and my small iPhone are not the best tools for retouching. And Lightroom Mobile doesn’t offer (yet) all of Lightroom’s features such as the local adjustments. So, that was it. Until 2 weeks ago.
Let’s be Smart
Because I’m a lazy kind of guy, I still have a bunch of travel photos from last year’s trip to Japan that I still have to touch. Being on a business trip for a few days, including a LOT of time in the place, let’s use this time for clearing a few hundreds of remaining photos. But I need unrestricted access to all of Lightroom’s features of course, so no Lightroom Mobile work. And I don’t have enough space on my laptop’s hard drive, so no way I’ll copy GBs of photos on it, or use a slow like hell external drive. That’s when I remembered those little Smart Previews, and how they can help me having access to all my Japan photos without too much precious space used, and fast access too. Let’s give it a try!
So for sharing photos between 2 computers you need:
- 2 computers:
- The “source computer”, that holds your main Catalogue
- The “target computer”, that you’ll use to work remotely on your photos
- Lightroom installed on each computer, preferably the very same version, at least the same major version (e.g. Lightroom 6.x)
- An external drive, or a shared drive on your network
- A bit of time 🙂
Going remote
Here is the thing:
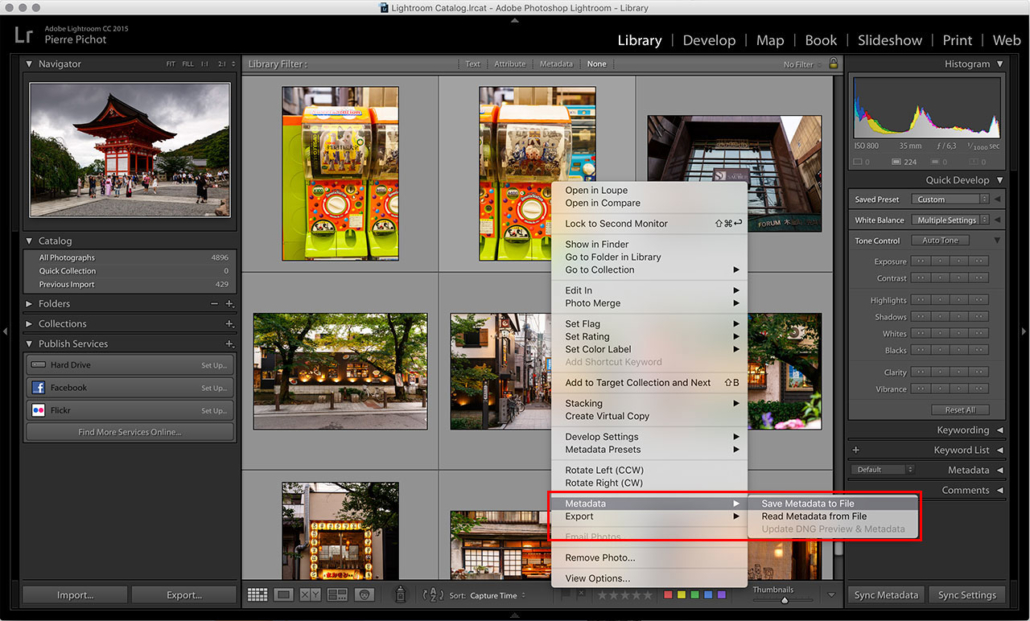
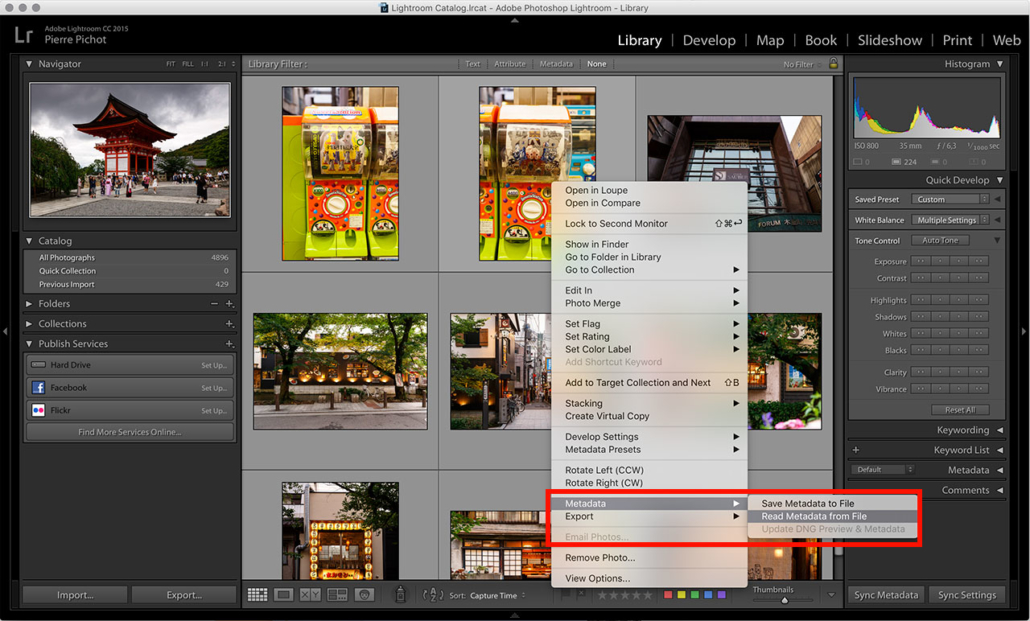
1. Save the photos’ metadata to a sidecar file on the source computer.You may have already a standard preset when importing photos into Lightroom, as I do. You also may have some already retouched photos that I could use as a reference. So you want to keep all the changes that have been done until now. The best way is to save all the development metadata to XMP sidecar files. Those are XML files that contain all the changes you do on your photos in Lightroom. The only constraint is that it doesn’t work with virtual copies, so be careful. Ideally the photos and the sidecar files should be on an external drive, or at least a shared drive that is reachable by the target computer. So select all the photos you want to work on in the Library module, then right-click on them and select Metadata > Save Metadata to File.
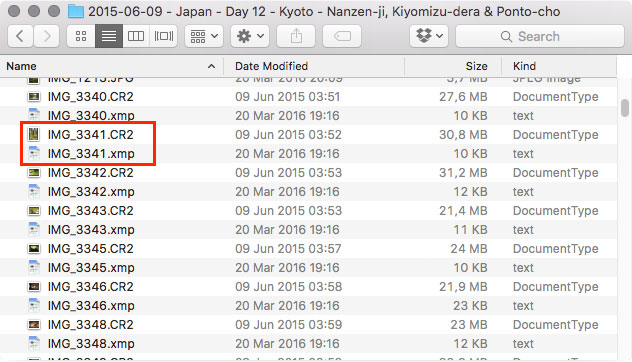
Now check that your RAW files (.CR2 files for me) have a matching .XMP file next to it:
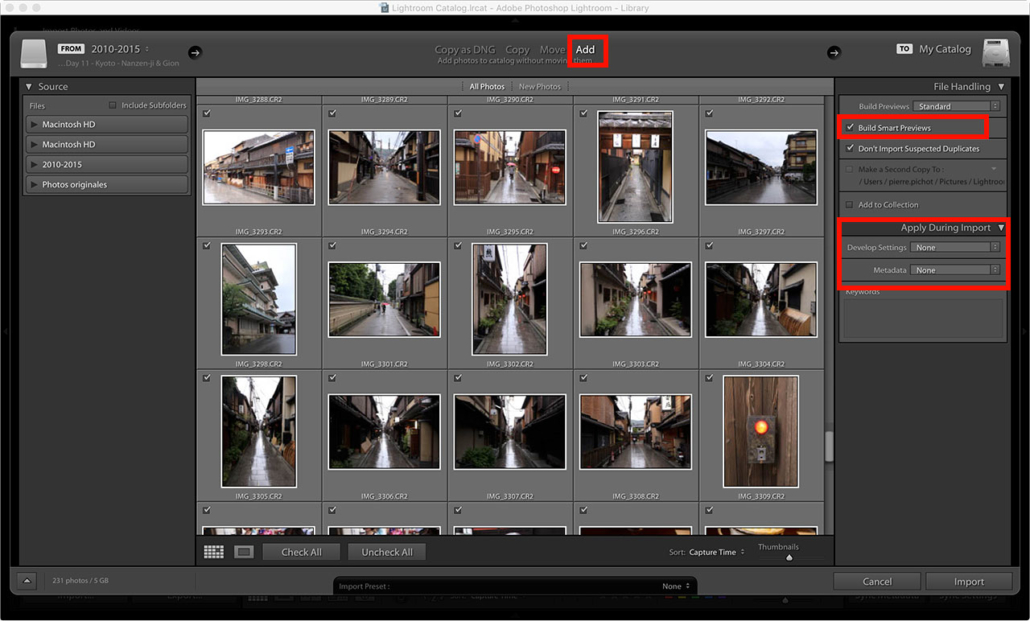
2. Import the photos on the target computer. Start an import procedure and browse for your external/shared drive until you find the photos you want to import. Lightroom will add them to its catalogue but will not copy them on the computer, which is what we want. It will also automatically load the content of the XMP sidecar file, so that all the previously done work will be imported as well in the target computer’s Lightroom’s database. Be careful not applying automatically any development or metadata presets during this import, it would discard the XMP sidecar files. And, of course, don’t forget the most important: check the “Build Smart Previews” checkbox 🙂
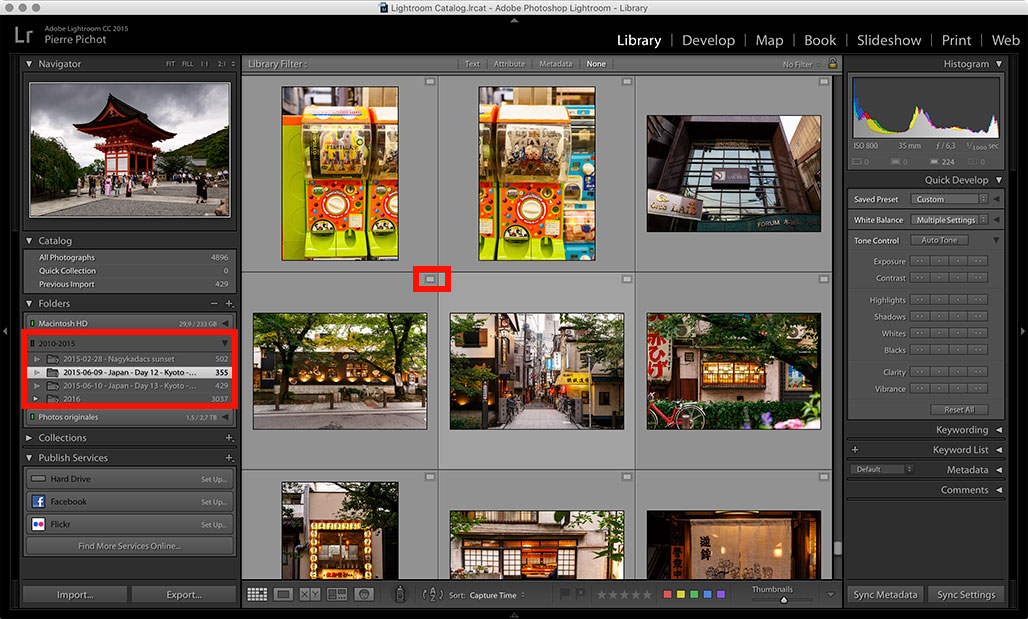
3. Wait for the Smart Previous to be generated then… go and have fun 🙂 Next time you’ll open Lightroom, without access to the original files, the folder containing the photos will be grey, meaning it is not reachable. But click on it and voilà, your Smart Previews will appear! They can be recognised by the small rectangle on the upper right side of the preview.
Easy, no?
So, how did it go?
Very well actually. Once in the plane I opened my laptop, started Lightroom, clicked on the grayed folder name in the library and all my photos were here with me. I can retouch them without any problem, I can go crazy with my local adjustments, I have no limitations. Well, almost no limitations: as I said before the Smart Previews are DNG files with a smaller resolution, so you lose the possibility to zoom 100%. You are also limited if you generate a TIFF file in a plugin. But that’s pretty much it. Knowing those limitations, I use this method to retouch files I know won’t need too much work, and surely no external plugin work. Another great point is the speed: being smaller files, they load almost instantly in the Develop module. It is even faster than with the standard files!
Going back
Being back home, I need to synchronise the changes I’ve done back to my source computer, which hosts my main catalogue. Easy!
1. Reconnect the target computer to the external/shared drive containing the original files.
2. Write the changes on the drive. For that, select all the retouched files in you Library and do a right click, then Metadata > Save Metadata to File, just like before. It will write the metadata in the sidecar files on the external/shared drive.
3. On the source computer, select the matching files in the Library and do a right click, then Metadata > Read Metadata from File. It will read the XMP sidecar files and load in Lightroom’s database the changes you’ve done on the other computer. It may take a while to update all the previews, but it’s here!
So now the source computer is in sync with the latest changes you made on your photos, just like if you’ve directly worked on it. You can delete the unneeded photos on the target computer, it will just clean its catalogue, it won’t affect the source computer or the external/shared drive, as long as it’s not reachable by the target computer. So make sure to unplug or disconnect the drive before.
And now what?
Beyond this special case, the usage of Smart Preview made me reconsider my whole photo storage strategy. As a laptop user, with a fast growing Library (thanks to my new passion for time-lapse 🙂 ), it’s getting impossible to store everything on a single drive, that is also fast enough to handle high resolution files. Large SSDs are not that large, and very expensive. Large HDDs are that that expensive, but still slow. Now I can generate Smart Previews for at least a large part of my catalogue and have it permanently with me, even on the go, while keeping my originals on an external drive that I can share with several computers. I don’t even need that drive to be very fast. It will only be needed for imports (obviously), exports, or when I need to use plugins. By the way, talking about export, the Smart Previews are big enough to allow web size exports from itself, not even needing the original file. Pretty handy!
Those Smart Previews are really changing the way my workflow has been until now. My backup strategy is going to change too. I don’t feel grounded by the lack of the original files not being with me anymore. And in the worst case scenario, I can get accessremotely to my NAS to download the few RAW files I need.
Now I’m waiting for Adobe to update Lightroom to be able to synchronise 2 instances via Creative Cloud. In the same way it’s used with the Lightroom Mobile app, I’m dreaming of the possibility to just mark my photos to be synchronised on the source computer and have them automatically appearing, and syncing, on the target computer. It will make things so much easier. But until then, let’s go with Smart Previews and XMP sidecar files!



 Pierre Pichot 2016
Leave a Reply
Want to join the discussion?Feel free to contribute!